2011年10月31日 星期一

MySQL installation failed with error 1045.

Lately I had some problem of MySQL installation when developing MySQL related applications.
I can't get into MySQL Administrator to configure MySQL system because I installed MySQL several months ago and I forgot the password of root.
Error no. 1045 occurred when I uninstalled my old MySQL system and re-install a new version.
Here is my way to resolve 1045 error to share with all MySQL Developer.  

OS Version: WinXP, Win7
MySQL Version: 5.5.10

My ways to resolve 1045:
1. Manually clear leftover. 
2. Use Revo Uninstaller.

  1. Manually clear leftover.
    • First, uninstall MySQL from control panel and reboot.
    • Open command window in Program list, or input "cmd" in Run from Start on left-bottom corner.
    • Type sc delete mysql to remove leftover MySQL Service. (If your service is different, please right click on My Computer, select Manage -> Service to look up your service name.)

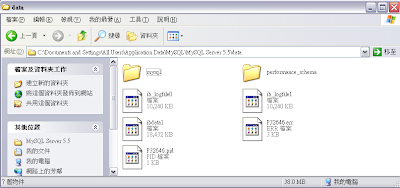
    • Go to this path: C:\Documents and Settings\All Users\Application Data\MySQL\MySQL Server 5.5 to delete MySQL Server 5.5 folder

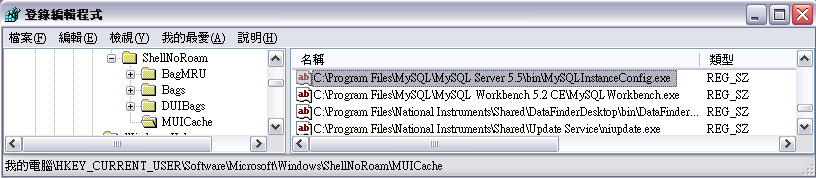
    • Open registry editor (Run -> type "regedit"), and delete the following 2 keys.
      HKEY_LOCAL_MACHINE\SOFTWARE\Microsoft\Windows\CurrentVersion\Installer\Folders\C:\Program Files\MySQL\MySQL Server 5.5\

      HKEY_CURRENT_USER\Software\Microsoft\Windows\ShellNoRoam\MUICache\C:\Program Files\MySQL\MySQL Server 5.5\bin\MySQLInstanceConfig.exe

    • Then MySQL can be installed to windows system successfully.


  2. Use Revo Uninstaller:
    Use Revo Uninstaller to uninstall MySQL and remove related registry and files.
    You can download Revo Uninstaller here.
    http://www.revouninstaller.com/revo_uninstaller_free_download.html
    • Install Revo Uninstaller, and then launch it.
      Click on MySQL Server 5.5 to run uninstall.

    • Click Next to launch MySQL Uninstaller after safety check.


      Click Next

    • MySQL Uninstallation finished.

    • Run step.4, click Next to analyze system by Revo Uninstaller.

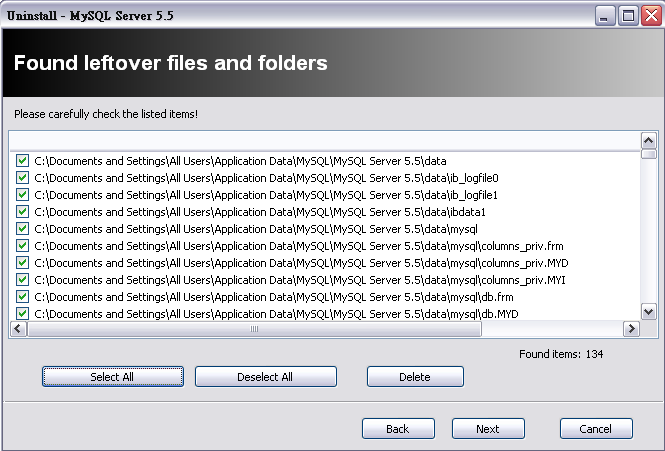
    • Click Select All -> Delete to remove leftover keys in registry.

    • Click Select All -> Delete to remove leftover files.

    • Reboot system is required to clean leftover files according to Revo Uninstaller's instruction. Before rebooting, we have to remove the service first.

    • Open command window in Program list, or input "cmd" in Run from Start on left-bottom corner.
    • Type sc delete mysql to remove leftover MySQL Service, then Reboot. (If your service is different, please right click on My Computer, select Manage -> Service to look up your service name.)

    • MySQL can be installed successfully after rebooting.

MySql安裝失敗,錯誤碼1045

近來開發MySQL相關應用程式時, 遇到MySQL的安裝問題
因為電腦中已經安裝舊的MySQL程式, 但是忘記root的密碼, 以至於無法管理MySQL系統
移除掉MySQL再重新安裝時, 卻發生1045的錯誤碼
以下是我解決1045錯誤碼的方法, 與各位MySQL開發人員分享.

作業系統:WinXP, Win7
MySql版本:5.5.10

 解決方式:
1. 手動解決
2. 用Revo Uninstaller解決
  1. 手動解決
    • 首先, 到控制台中移除系統中的MySQL, 然後重新開機.
    • 到程式集打開command window, 或是在左下角的Run輸入"cmd"打開command window.
    • 輸入sc delete mysql, 手動將殘存的MySQLService移除. (如果您是以其他Service名稱註冊, 請在我的電腦點右鍵 -> 管理 -> 服務,查詢您的MySQL Service名稱)

    • C:\Documents and Settings\All Users\Application Data\MySQL\MySQL Server 5.5路徑, 將MySQL Server 5.5資料夾清除掉
    •  打開登錄編輯器(Run -> 輸入regedit), 清除以下兩筆登錄值
      HKEY_LOCAL_MACHINE\SOFTWARE\Microsoft\Windows\CurrentVersion\Installer\Folders\C:\Program Files\MySQL\MySQL Server 5.5\


      HKEY_CURRENT_USER\Software\Microsoft\Windows\ShellNoRoam\MUICache\C:\Program Files\MySQL\MySQL Server 5.5\bin\MySQLInstanceConfig.exe

    • 接下來重新安裝MySQL即可安裝成功

  2.  用Revo Uninstaller解決Revo Uninstaller這套軟體將MySQL移除, 並清除掉相關的檔案及登錄檔
    Revo Unistaller可以在這裡下載:
    http://www.revouninstaller.com/revo_uninstaller_free_download.html

    • 安裝Revo Uninstaller之後, 執行Revo Uninstaller
      點選MySql Server 5.5進行移除的動作

    • 進行安全掃描後, 選擇Next呼叫MySQL Uninstaller進行移除


      點選Next


      選擇Remove進行MySQL的移除


      MySQL移除程式執行完畢

    • 進行第4步驟, 點選Next讓Revo Uninstaller進行系統分析

    • 點選Select All -> Delete, 將殘存的登錄值清除掉

    • 點選Select All -> Delete, 將殘存的檔案清除掉

    • 依照Revo Uninstaller指示, 須重新開機將殘存檔案清除乾淨, 但重開機之前還要再手動將Service清除掉

    • 到程式集打開command window, 或是在左下角的Run輸入"cmd"打開command window.
    • 輸入sc delete mysql, 手動將殘存的MySQL Service移除, 然後重新開機. (如果您是以其他Service名稱註冊, 請在我的電腦點右鍵 -> 管理 -> 服務,查詢您的MySQL Service名稱)

    • 重開機之後, 再安裝MySQL即可順利安裝成功囉

2011年10月27日 星期四

[MFC] How to get the pointers of Doc,View,MainFrmae,App in SDI, MDI

When developing MFC program on Document/View architecture, the first problem we usually have is how to get the pointers of Doucment, View, MainFrame and App.
Below are some common methods to get the pointers:
  1. Get the pointer of Application Class CWinApp:Use MFC Global Function AfxGetApp() to get it.
     

  2. Get the pointer of MainFrame
    • User member variable: m_pMainWnd
      (
      m_pMainWnd is the member variable of CWinThread, and CWinApp derived from CWinThread, so we can use the member of CWinThread to get the pointer of Main frame )
      CMainFrame* pMainWnd = (CMainFrame*) AfxGetApp()->m_pMainWnd;
    • Use MFC Global Function AfxGetMainWnd() to get it.
      CMainFrame* pMainWnd =(CMainFrame*) AfxGetMainWnd();
  3. Get the pointer of Document in View
    Us
    e the member function GetDocument() to get it.
    CMyAppDoc*
    pDoc = GetDocument();
  4. Get the pointer of Active View
    First,
    get the pointer of MainFrame, and then use GetActiveView() to get the pointer of View by MainFrame.
    CMainFrame* pMainWnd = (CMainFrame*) AfxGetApp()->m_pMainWnd; 
    CMyAppView* pView = ( CMyAppView*) pMainWnd->GetActiveView();
  5. Get the pointer of Active Document
    First,
    get the pointer of FrameWnd, and then use GetActiveDocument() to get the pointer of Document by FrameWnd.
    CFrameWnd* pMainFrm = (CFrameWnd*) AfxGetApp()->m_pMainWnd;
    CDocument* pCurDoc = (CFrameWnd*) pMainFrm ->GetActiveDocument();


[MFC] SDI, MDI如何取得Doc,View,MainFrmae,App之指標

開發MFC Document/View架構的程式時,首先遇到的問題就是如何取得Doucment, View, MainFrame與App的指標。
以下是一些常用的指標取得方法:

  1. 取得應用程式類別CWinApp指標
    MFC全域函數 AfxGetApp() 取得
     
  2. 取得MainFrame指標
    • 使用成員變數m_pMainWnd
      (
      m_pMainWndCWinThread的成員變數, CWinApp繼承自CWinThread, 故可使用m_pMainWnd取得主視窗之指標)
      CMainFrame* pMainWnd = (CMainFrame*) AfxGetApp()->m_pMainWnd;
    • 透過MFC全域函數 AfxGetMainWnd() 取得
      CMainFrame* pMainWnd = (CMainFrame*) AfxGetMainWnd();
  3. View中取得Document指標
    用View的成員函數
    GetDocument()取得
    CMyAppDoc*
    pDoc=GetDocument();

  4. 取得現行的View指標先取得MainFrame指標,再由MainFrameGetActiveView()函數取得View的指標
    CMainFrame* pMainWnd = (CMainFrame*) AfxGetApp()->m_pMainWnd; 

    CMyAppView* pView = ( CMyAppView*) pMainWnd->GetActiveView();


  5. 取得現行的Document指標
    先取得
    FrameWnd指標,再由FrameWndGetActiveDocument()函數取得Document的指標
    CFrameWnd* pMainFrm = (CFrameWnd*) AfxGetApp()->m_pMainWnd;
    CDocument* pCurDoc = (CFrameWnd*) pMainFrm ->GetActiveDocument();


2011年10月19日 星期三

How to use DebugView in Win7

        If you use Win7 to develop Windows applications, you may find that DebugView can't receive the string sent from OutputDebugString. It's quite inconvenient  especially when debugging on Timer or some continuous events (Such as OnPaint or Mouse events...etc). This function should be disabled on Win7 because of security consideration.
        If you want to enable the function of receiving debug string by DebugView, please follow the steps below:
  1. Open Registry Editor. (Run -> regedit)
  2. Go to this key: [HKEY_LOCAL_MACHINE\SYSTEM\CurrentControlSet\Control\Session Manager]
  3. Create a new key called [Debug Print Filter].
  4. Create a new DWORD value called "DEFAULT", and set the value to 0x0f as the following image.
  5. Reboot. (To make the modification effective)
 
And then you can use DebugView to receive the debug strings sent from OutputDebugString.

The description of OutputDebugString:

如何在Win7使用DebugView

使用Win7開發Windows程式的朋友可能會發現,DebugView在Win7無法接收到OutputDebugString所拋出來的訊息,這樣對Timer或是連續性的Event(像是OnPaint, 或是Mouse的Event...等)進行除錯時相當不方便,這應該是Win7基於安全原則考量而將此功能關掉。如果要打開接收Debug string的功能,請依下列步驟執行:
  1. 打開登錄檔編輯器(Run->regedit)
  2. 打開這個Key:[HKEY_LOCAL_MACHINE\SYSTEM\CurrentControlSet\Control\Session Manager]
  3. 建立[Debug Print Filter]這個key.
  4. 新增一個"DEFAULT"的DWORD值,並將其內容設定為0x0f,如下圖所示。
  5. 重新開機(讓修改的登錄值生效)


之後您便可以用OutputDebugString來輸出除錯訊息到DbgView了。

OutputDebugString的函數說明:

關於DebugView,您可以在以下網址下載: